> ## Documentation Index
> Fetch the complete documentation index at: https://platform.minimaxi.com/docs/llms.txt
> Use this file to discover all available pages before exploring further.

# 在 OpenClaw 中接入 MiniMax 模型

> <Note> 本教程将指导您如何在 OpenClaw（原 clawdbot）中配置 MiniMax M2.7 模型，并通过 iMessage 或飞书与 AI 助手进行对话。 </Note>

<div style={{display: 'flex', alignItems: 'center', gap: '12px', marginBottom: '16px'}}>
  <div style={{width: '40px', height: '40px', borderRadius: '50%', background: 'linear-gradient(135deg, #6366f1, #8b5cf6)', display: 'flex', alignItems: 'center', justifyContent: 'center', color: 'white', fontWeight: 'bold'}}>M</div>

  <div>
    <div style={{fontWeight: 500}}>MiniMax 开放平台解决方案</div>
    <div style={{fontSize: '0.875rem', color: '#9ca3af'}}>2026年1月28日</div>
  </div>
</div>

<a href="https://github.com/openclaw/openclaw" target="_blank" style={{display: 'inline-flex', alignItems: 'center', gap: '8px', padding: '8px 16px', borderRadius: '8px', border: '1px solid #e5e7eb', textDecoration: 'none', color: 'inherit', marginBottom: '32px'}}>
  <svg height="20" width="20" viewBox="0 0 16 16" fill="currentColor">
    <path d="M8 0C3.58 0 0 3.58 0 8c0 3.54 2.29 6.53 5.47 7.59.4.07.55-.17.55-.38 0-.19-.01-.82-.01-1.49-2.01.37-2.53-.49-2.69-.94-.09-.23-.48-.94-.82-1.13-.28-.15-.68-.52-.01-.53.63-.01 1.08.58 1.23.82.72 1.21 1.87.87 2.33.66.07-.52.28-.87.51-1.07-1.78-.2-3.64-.89-3.64-3.95 0-.87.31-1.59.82-2.15-.08-.2-.36-1.02.08-2.12 0 0 .67-.21 2.2.82.64-.18 1.32-.27 2-.27.68 0 1.36.09 2 .27 1.53-1.04 2.2-.82 2.2-.82.44 1.1.16 1.92.08 2.12.51.56.82 1.27.82 2.15 0 3.07-1.87 3.75-3.65 3.95.29.25.54.73.54 1.48 0 1.07-.01 1.93-.01 2.2 0 .21.15.46.55.38A8.013 8.013 0 0016 8c0-4.42-3.58-8-8-8z" />
  </svg>

  在 GitHub 上查看
</a>

## 什么是 OpenClaw？

**[OpenClaw](https://docs.openclaw.ai)（原 clawdbot）** 是一个开源的 AI 助手，完全本地化 ，可以将各种消息平台与 AI 模型连接起来。它支持 WhatsApp、Telegram、Discord、iMessage 等多种平台，让您可以随时随地与 AI 助手对话。

<Columns cols={2}>
  <Card title="多平台支持" icon="message-circle">
    支持 WhatsApp、Telegram、Discord、iMessage 等主流消息平台
  </Card>

  <Card title="AI Agent 桥接" icon="bot">
    支持 Pi 等 Coding Agent，具备工具调用和流式输出能力
  </Card>

  <Card title="多 Agent 路由" icon="git-branch">
    可将不同账户路由到隔离的 Agent，各自独立工作
  </Card>

  <Card title="MiniMax 集成" icon="sparkles">
    原生支持 MiniMax M2.7 作为模型提供商
  </Card>
</Columns>

***

## 快速开始

<Note>
  官方文档：[OpenClaw 快速开始指南](https://docs.openclaw.ai/start/getting-started)
</Note>

### 前置条件

* Mac OS（如需使用 iMessage）
* 拥有具备 Token Plan 或积分权限的 MiniMax [Token Plan Key](https://platform.minimaxi.com/user-center/payment/token-plan)，或 [按量付费](https://platform.minimaxi.com/user-center/basic-information/interface-key) API Key

### 安装openclaw

<Warning>
  openclaw老用户，建议也先通过以下安装命令对openclaw进行更新。
</Warning>

在终端中运行以下命令一键安装：

<Tabs>
  <Tab title="macOS / Linux">
    ```bash theme={null}
    curl -fsSL https://openclaw.bot/install.sh | bash
    ```
  </Tab>

  <Tab title="Windows">
    ```powershell theme={null}
    iwr -useb https://openclaw.ai/install.ps1 | iex
    ```
  </Tab>
</Tabs>

### 配置 MiniMax 模型

<Tabs>
  <Tab title="通过OAuth登录">
    <Steps>
      <Step title="选择配置选项">
        如果openclaw的初始配置引导没有出现模型配置，则可以通过以下命令再次进行 openclaw 配置：

        ```bash theme={null}
        openclaw configure
        ```
      </Step>

      <Step title="选择配置选项">
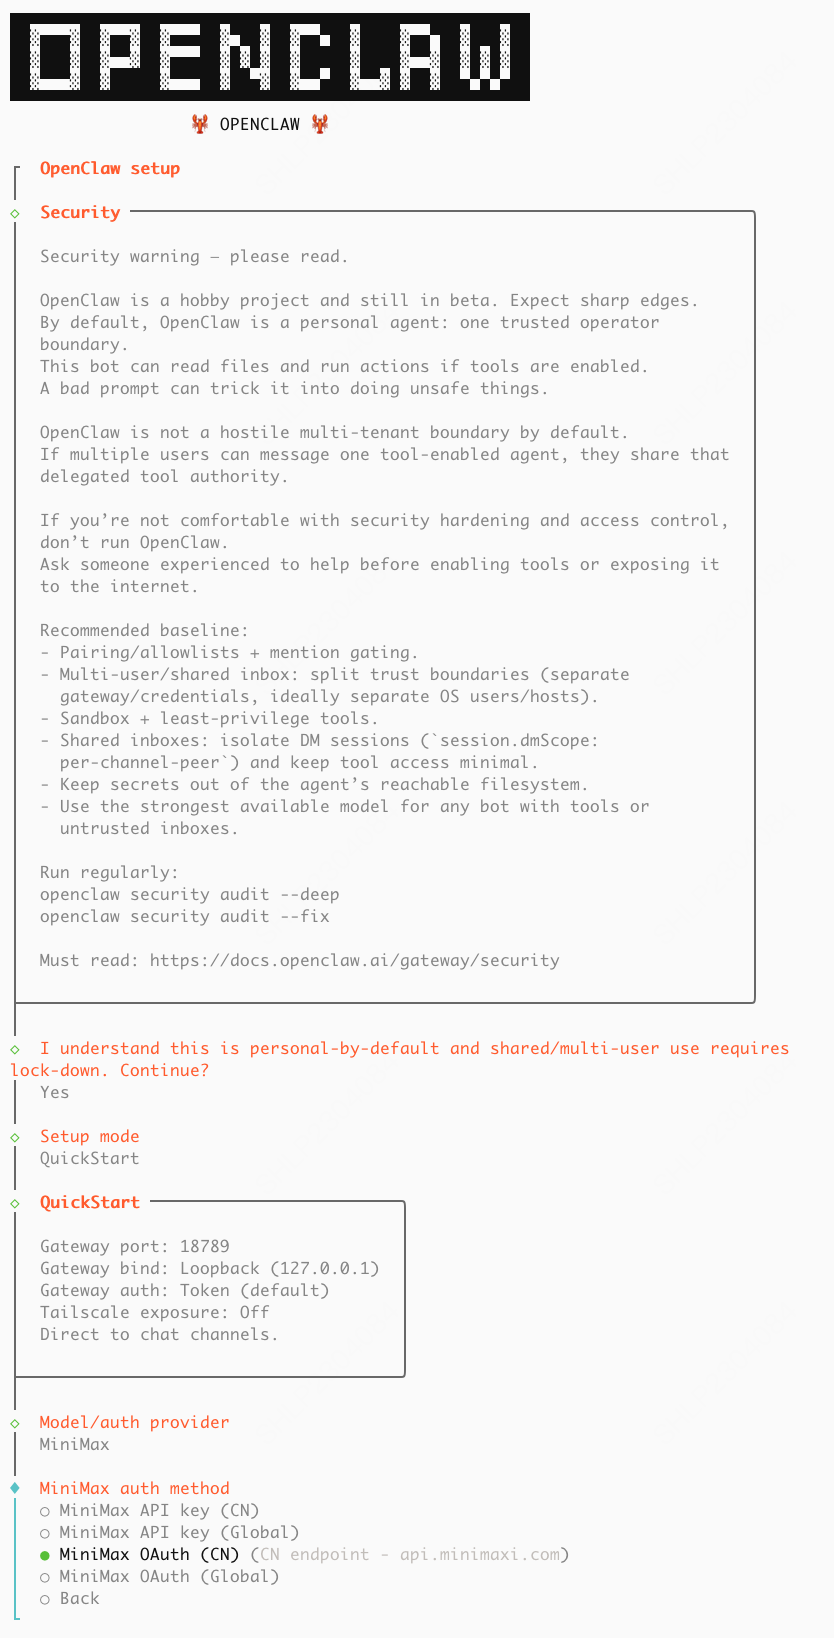
        * Where will the Gateway run? → 选择 **Local (this machine)**
        * Select sections to configure → 选择 **Model**
        * Model/auth provider → 选择 **MiniMax**
        * MiniMax auth method → 选择 **MiniMax CN — OAuth (minimaxi.com)**

        <img src="https://filecdn.minimax.chat/public/31b13265-79e4-4162-8985-de00fbfe2b87.png" alt="前端配置界面" style={{borderRadius: '8px', marginTop: '12px', maxWidth: '100%'}} />
      </Step>

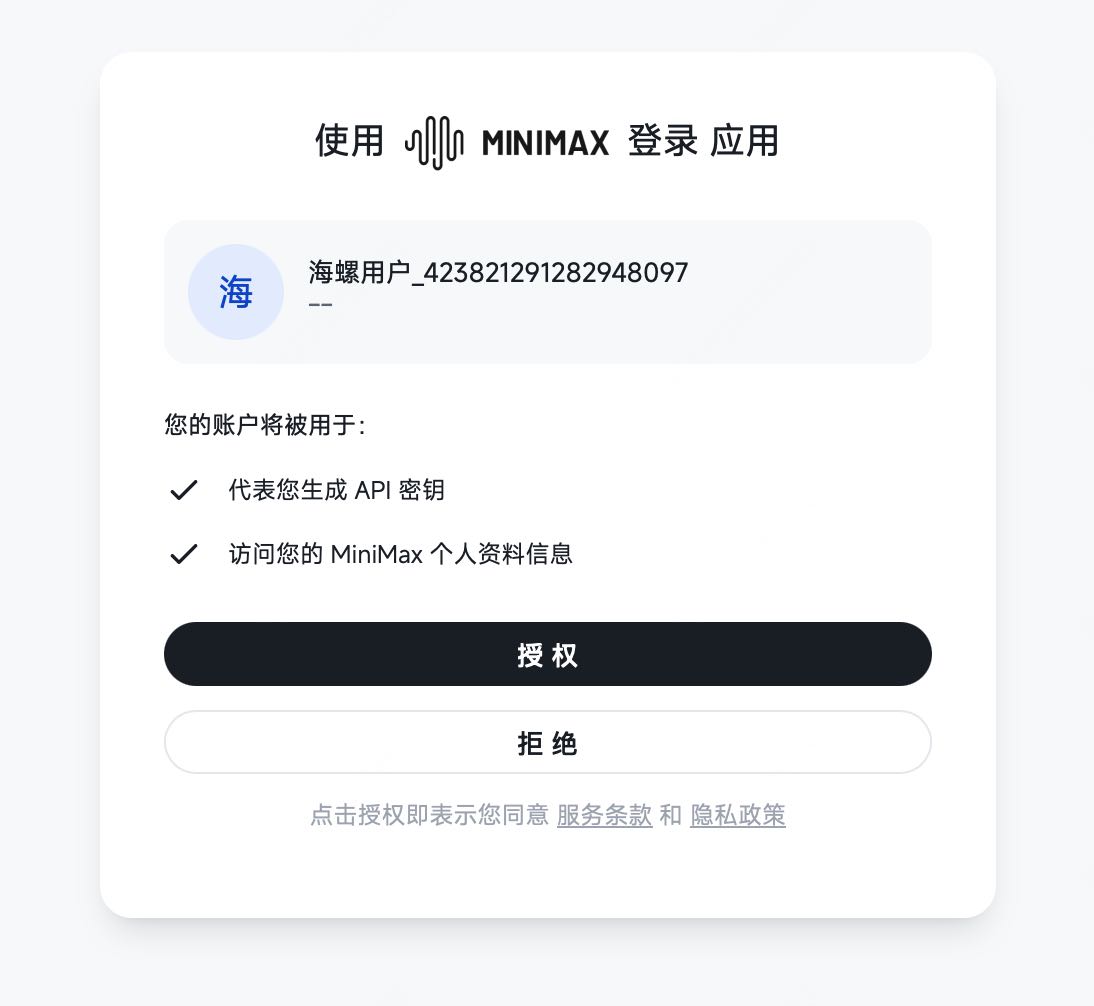
      <Step title="登录授权">
        自动弹出登录页，登录并授权。

        <img src="https://filecdn.minimax.chat/public/809a685b-8fca-4aa5-bdbf-4d2536f8f8fb.jpeg" alt="前端配置界面" style={{borderRadius: '8px', marginTop: '12px', maxWidth: '60%'}} />
      </Step>

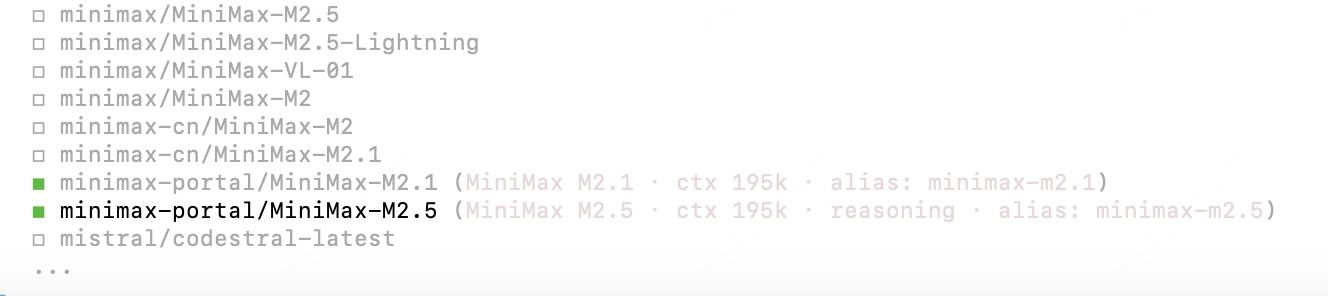
      <Step title="确认模型选择">
        OAuth 登录完成后，进入模型选择。系统会默认勾选 `minimax-portal/MiniMax-M2.5` 和 `minimax-portal/MiniMax-M2.7`，并将 `minimax-portal/MiniMax-M2.7` 设为默认模型，可直接按回车确认使用。

        <img src="https://filecdn.minimax.chat/public/c0c751b0-4e40-4b33-8d01-ffcc60531e29.jpg" alt="前端配置界面" style={{borderRadius: '8px', marginTop: '12px', maxWidth: '100%'}} />
      </Step>
    </Steps>
  </Tab>

  <Tab title="手动安装与配置">
    <Warning>
      推荐使用「一键安装OAuth并登录」的方式进行安装。若登录失败，可尝试以下方法。
    </Warning>

    <Steps>
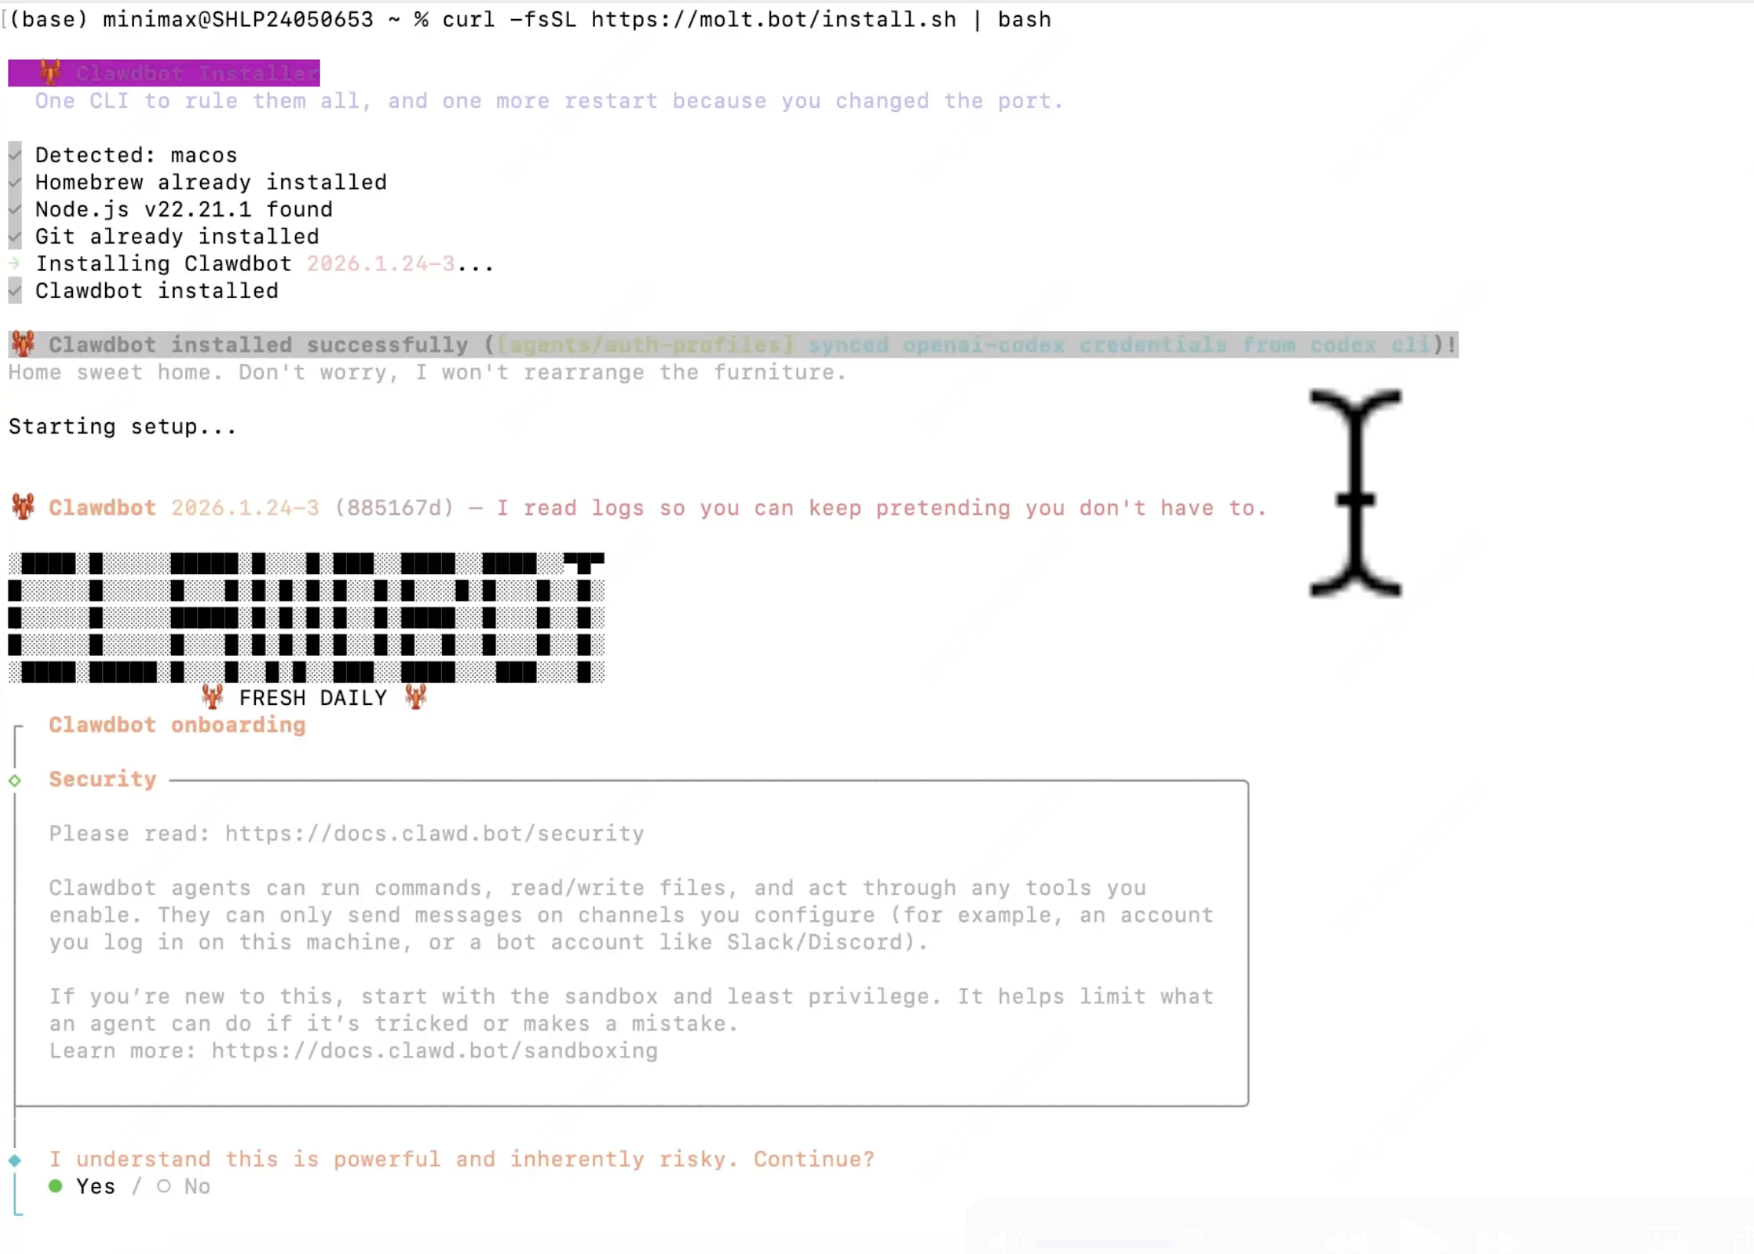
      <Step title="进入配置流程">
        初次安装时一般会直接进入配置流程。若没有自动开始，可通过以下命令手动启动：

        ```bash theme={null}
        openclaw onboard --install-daemon
        ```

        <img src="https://filecdn.minimax.chat/public/c3c91a9c-f1bd-4b1f-9ed3-f7863af6c7b8.png" alt="下载安装" style={{borderRadius: '8px', marginTop: '12px', maxWidth: '100%'}} />

        基本配置选择：

        * **Step 1**: 同意声明 → 选择 **Yes**
        * **Step 2**: Onboarding Mode → 选择 **QuickStart**
        <Warning>
          如果openclaw的初始配置引导没有出现模型配置，则可以通过以下命令进入 openclaw 配置：

          ```bash theme={null}
          openclaw configure
          ```

          对于 "Where will the Gateway run?" 项，选择 **Local (this machine)**；对于 "Select sections to configure"项，选择 **Model**。
        </Warning>
      </Step>

      <Step title="模型配置">
        * **Step 1**: Model/auth provider → 选择 **MiniMax**
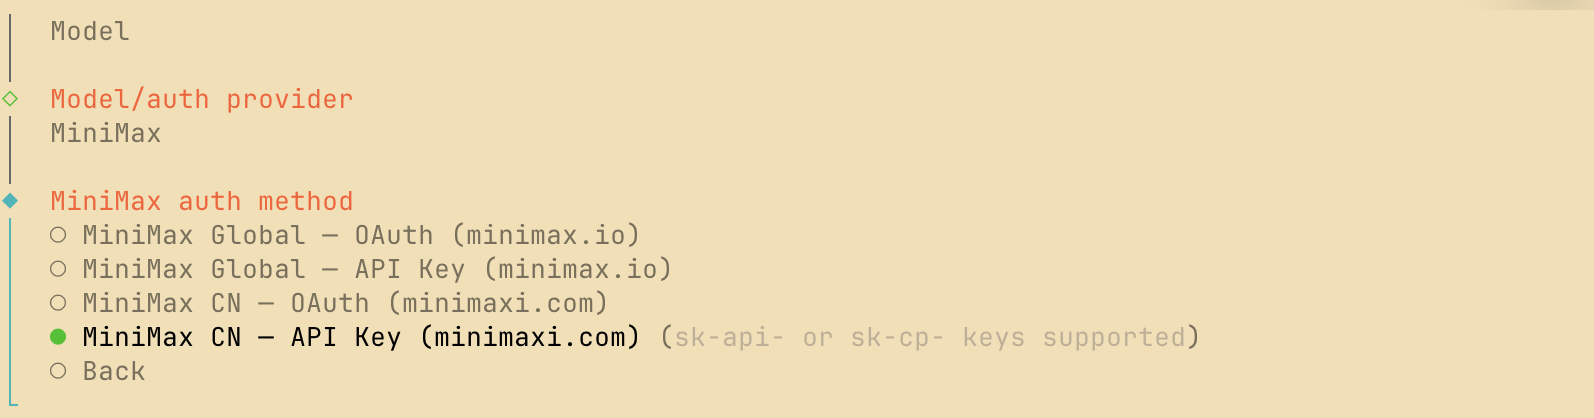
        * **Step 2**: MiniMax auth method → 选择 **MiniMax CN — API Key (minimaxi.com)**，海外用户选择 **MiniMax Global — API Key (minimax.io)**

        <img src="https://mintcdn.com/minimax-zh/kpwl9avqkcFIxqOO/images/openclaw-auth-method-apikey.png?fit=max&auto=format&n=kpwl9avqkcFIxqOO&q=85&s=afb339d8649cdc393dff2c9286569454" alt="选择API Key认证方式" style={{borderRadius: '8px', marginTop: '12px', maxWidth: '100%'}} width="1594" height="418" data-path="images/openclaw-auth-method-apikey.png" />

        * **Step 3**: MiniMax API key → 填入您的 **MiniMax API Key**

        <Note>
          请注意区分 API Key 类型：

          * **Token Plan**：通过 [接口密钥 > Token Plan Key](https://platform.minimaxi.com/user-center/payment/token-plan) 获取，以`sk-cp`开头
          * **按量付费**：通过 [接口密钥 > 创建新的 API Key](https://platform.minimaxi.com/user-center/basic-information/interface-key) 获取，以`sk-api`开头
        </Note>

        * **Step 4**: Models in /model picker → 直接回车使用默认选项
      </Step>

      <Step title="功能配置">
        * **Step 1**: 按需选择 channel（需要在什么 App 中进行对话）
        * **Step 2**: 按需配置 Skill
        * **Step 3**: 按需启用 Hooks（可选）：
          * 💾 **session-memory**: 执行 `/new` 时自动保存会话上下文
          * 📝 **command-logger**: 记录所有命令到日志文件
          * 🚀 **boot-md**: 网关启动时运行 BOOT.md
      </Step>

      <Step title="测试对话">
        输入 `openclaw tui` ，若成功对话则表示配置成功：

        <img src="https://filecdn.minimax.chat/public/f2775a9a-e0b8-4eef-b2f7-2440cc6e622d.png" alt="下载安装" style={{borderRadius: '8px', marginTop: '12px', maxWidth: '100%'}} />
      </Step>
    </Steps>
  </Tab>
</Tabs>

***

## 接入 iMessage

<Note>
  需要准备：Mac 电脑 + iPhone，且 Mac 端「信息 (Messages)」应用需完成登录。
</Note>

<Steps>
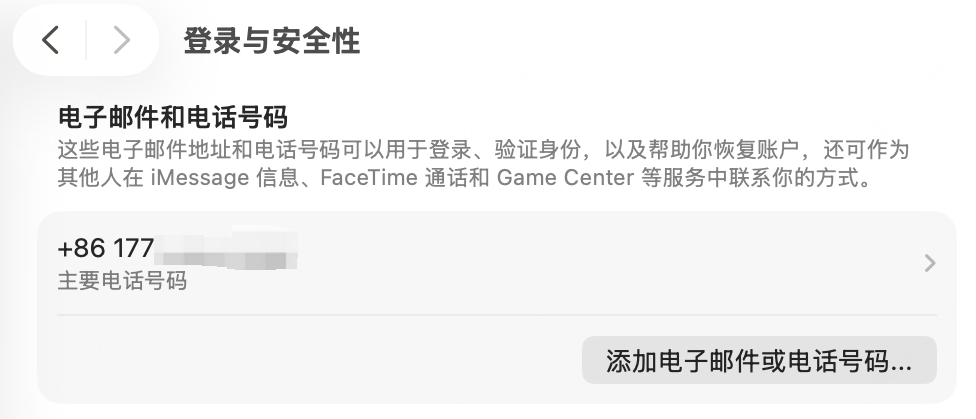
  <Step title="添加邮箱到 Apple ID">
    电脑需用邮箱登录 iMessage（手机上则是用手机号发送信息），防止自己和自己陷入循环对话。

    若之前 Apple ID 没有添加邮箱：

    1. 在苹果设备上打开「设置」App
    2. 点击顶部「Apple ID」
    3. 点击「登陆与安全性」
    4. 在「电子邮件」栏点击「添加电子邮件」
    5. 输入邮箱地址并按提示完成验证

    <img src="https://filecdn.minimax.chat/public/acc44e18-db64-4ecd-a486-8e0f59491f3b.png" alt="前端配置界面" style={{borderRadius: '8px', marginTop: '12px', maxWidth: '100%'}} />
  </Step>

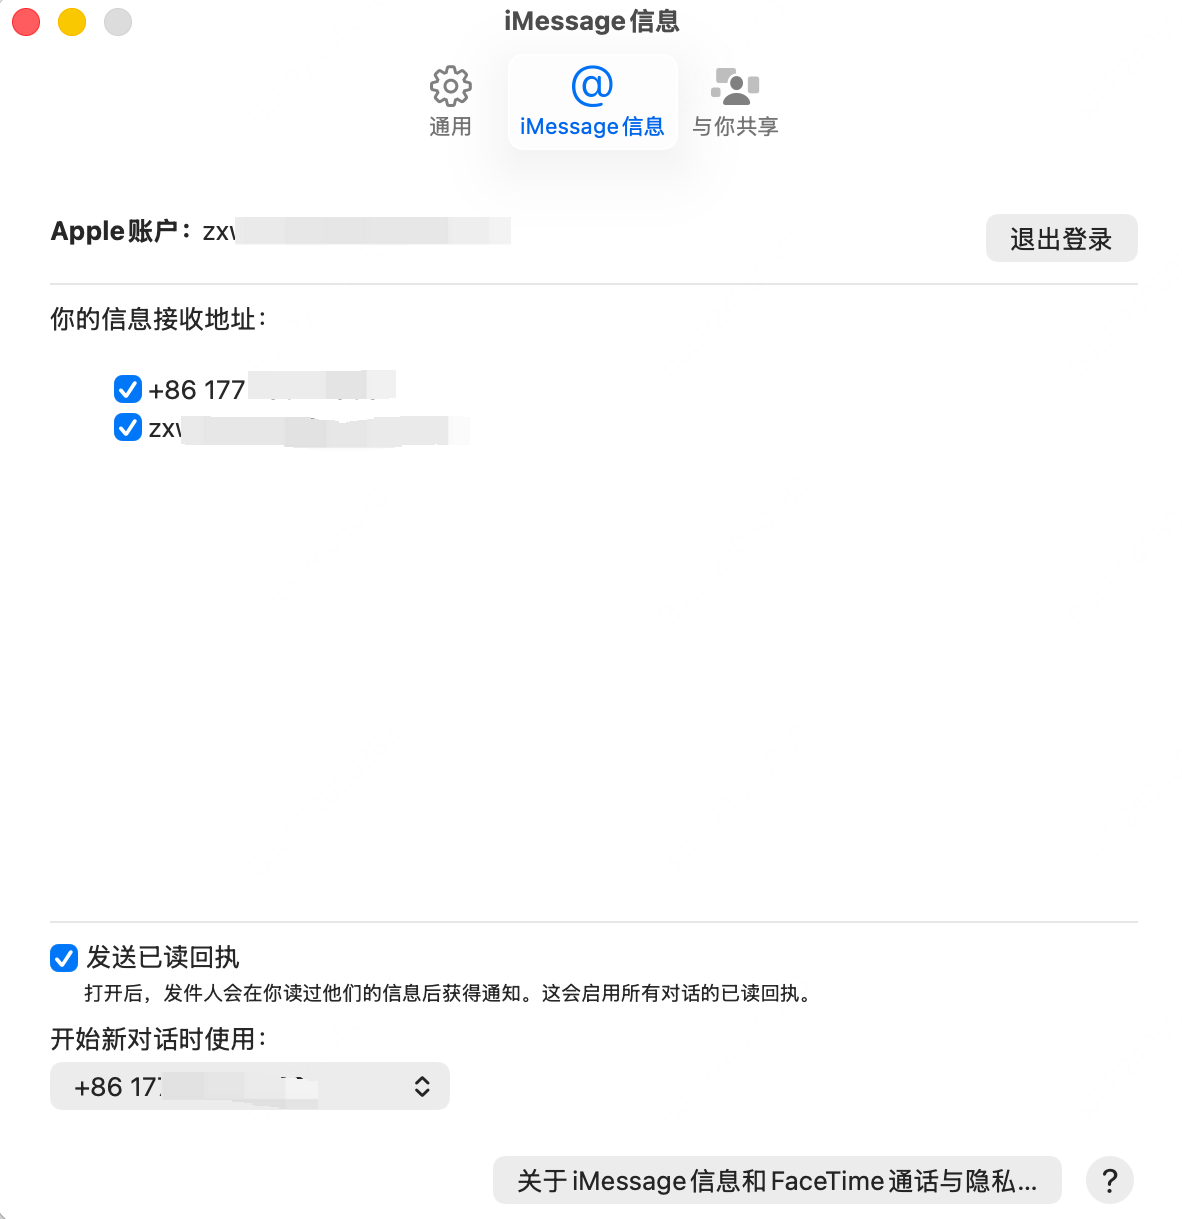
  <Step title="在 iMessage 里启用邮箱">
    1. 在 Mac 上打开「信息」App
    2. 在左上方菜单栏点击「信息」→「设置」
    3. 开启「iMessage 信息」
    4. 点击「发送与接收」
    5. 确保新添加的邮箱开关已打开

    <img src="https://filecdn.minimax.chat/public/db8c7c8e-b343-43b8-b826-55c92eb2bf9b.png" alt="前端配置界面" style={{borderRadius: '8px', marginTop: '12px', maxWidth: '60%'}} />
  </Step>

  <Step title="安装核心工具 imsg">
    打开 Mac 终端，依次执行以下命令：

    <Note>
      注意，此处如果报错，您需要按报错信息安装新版 Xcode
    </Note>

    ```bash theme={null}
    # 安装 imsg 工具
    brew install steipete/tap/imsg

    # 验证安装是否成功
    imsg chats --limit 1
    ```
  </Step>

  <Step title="配置 iMessage 通道">
    在终端输入配置命令：

    ```bash theme={null}
    openclaw configure
    ```

    依次执行以下步骤：

    * **Step 1**: 「Where will the Gateway run?」→ **Local (this machine)**
    * **Step 2**: 「Select sections to configure」→ **channels**
    * **Step 3**: 「Select a channel to configure/link」→ **iMessage Local**
    * **Step 4**: 「Configure iMessage Local?」→ **Skip (leave as-is)**
    * **Step 5**: 「Finished configuring?」→ **Finished**
    * **Step 6**: 「DM Access」→ **Pairing**
  </Step>

  <Step title="修改 iMessage 配置文件">
    打开配置文件：

    ```bash theme={null}
    open ~/.openclaw/openclaw.json
    ```

    找到 `channels` 下的 `imessage` 板块，确保内容如下：

    ```json theme={null}
    "imessage": {
      "enabled": true,
      "cliPath": "imsg路径",
      "dbPath": "chat.db路径"
    }
    ```

    <Accordion title="如何获取路径">
      * **imsg 路径**: 终端输入 `which imsg`，通常是 `/Users/用户名/.homebrew/bin/imsg`
      * **chat.db 路径**: Finder → 菜单栏「前往」→ 按住 Option 点击「资源库」→ 打开 Messages 文件夹 → 找到 chat.db → 右键按住 Option → 选择「将…拷贝为路径名称」
    </Accordion>

    保存后重启网关服务：

    ```bash theme={null}
    openclaw gateway restart
    ```
  </Step>

  <Step title="授权访问权限">
    操作完成后，电脑端会弹出访问权限授权弹窗，点击「允许」。

    如果没有弹窗，需要手动授权：

    <Accordion title="手动授权步骤">
      **打开 imsg 的完全磁盘访问权限：**

      1. 系统设置 → 隐私与安全性 → 完全磁盘访问权限
      2. 点「+」→ 按 ⌘+⇧+G
      3. 粘贴 `/Users/用户名/.homebrew/bin`
      4. 选择 `imsg` → 点「打开」

      **打开终端的完全磁盘访问权限：**

      1. 系统设置 → 隐私与安全性 → 完全磁盘访问权限
      2. 点「+」→ 按 ⌘+⇧+G
      3. 粘贴 `/Applications/Utilities/Terminal.app`
      4. 点「打开」
    </Accordion>
  </Step>

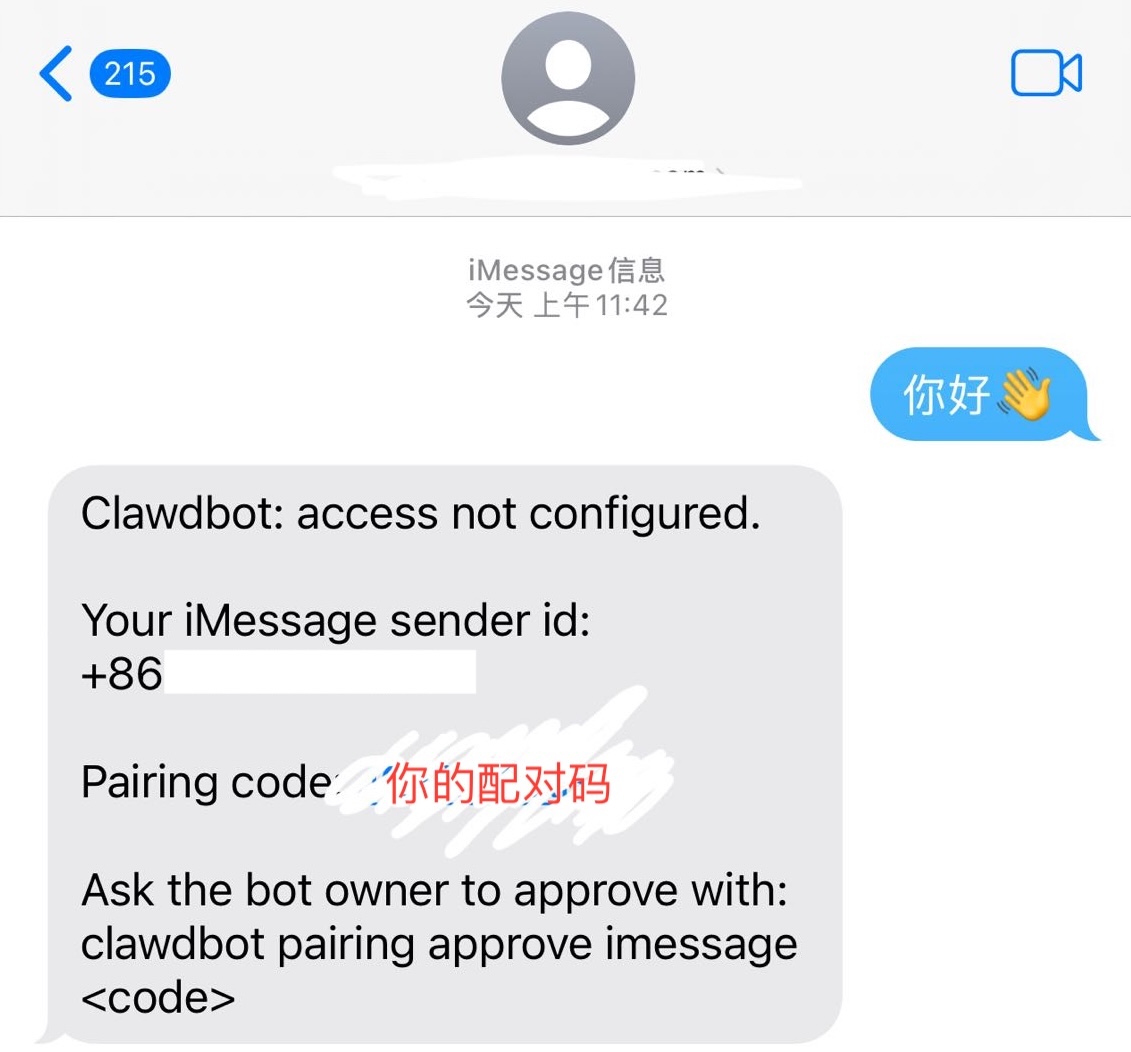
  <Step title="配对连接">
    用手机给 iMessage 账号（即前面配置的邮箱）发消息，会收到一个配对码。

    在终端执行以下配对命令（将 `<配对码>` 替换为收到的配对码）：

    ```bash theme={null}
    openclaw pairing approve imessage <配对码>
    ```

    <img src="https://filecdn.minimax.chat/public/6c9fdf8d-cee0-4513-b5be-0bd365905d67.jpeg" alt="iMessage 配对" style={{borderRadius: '8px', marginTop: '12px', maxWidth: '50%'}} />
  </Step>

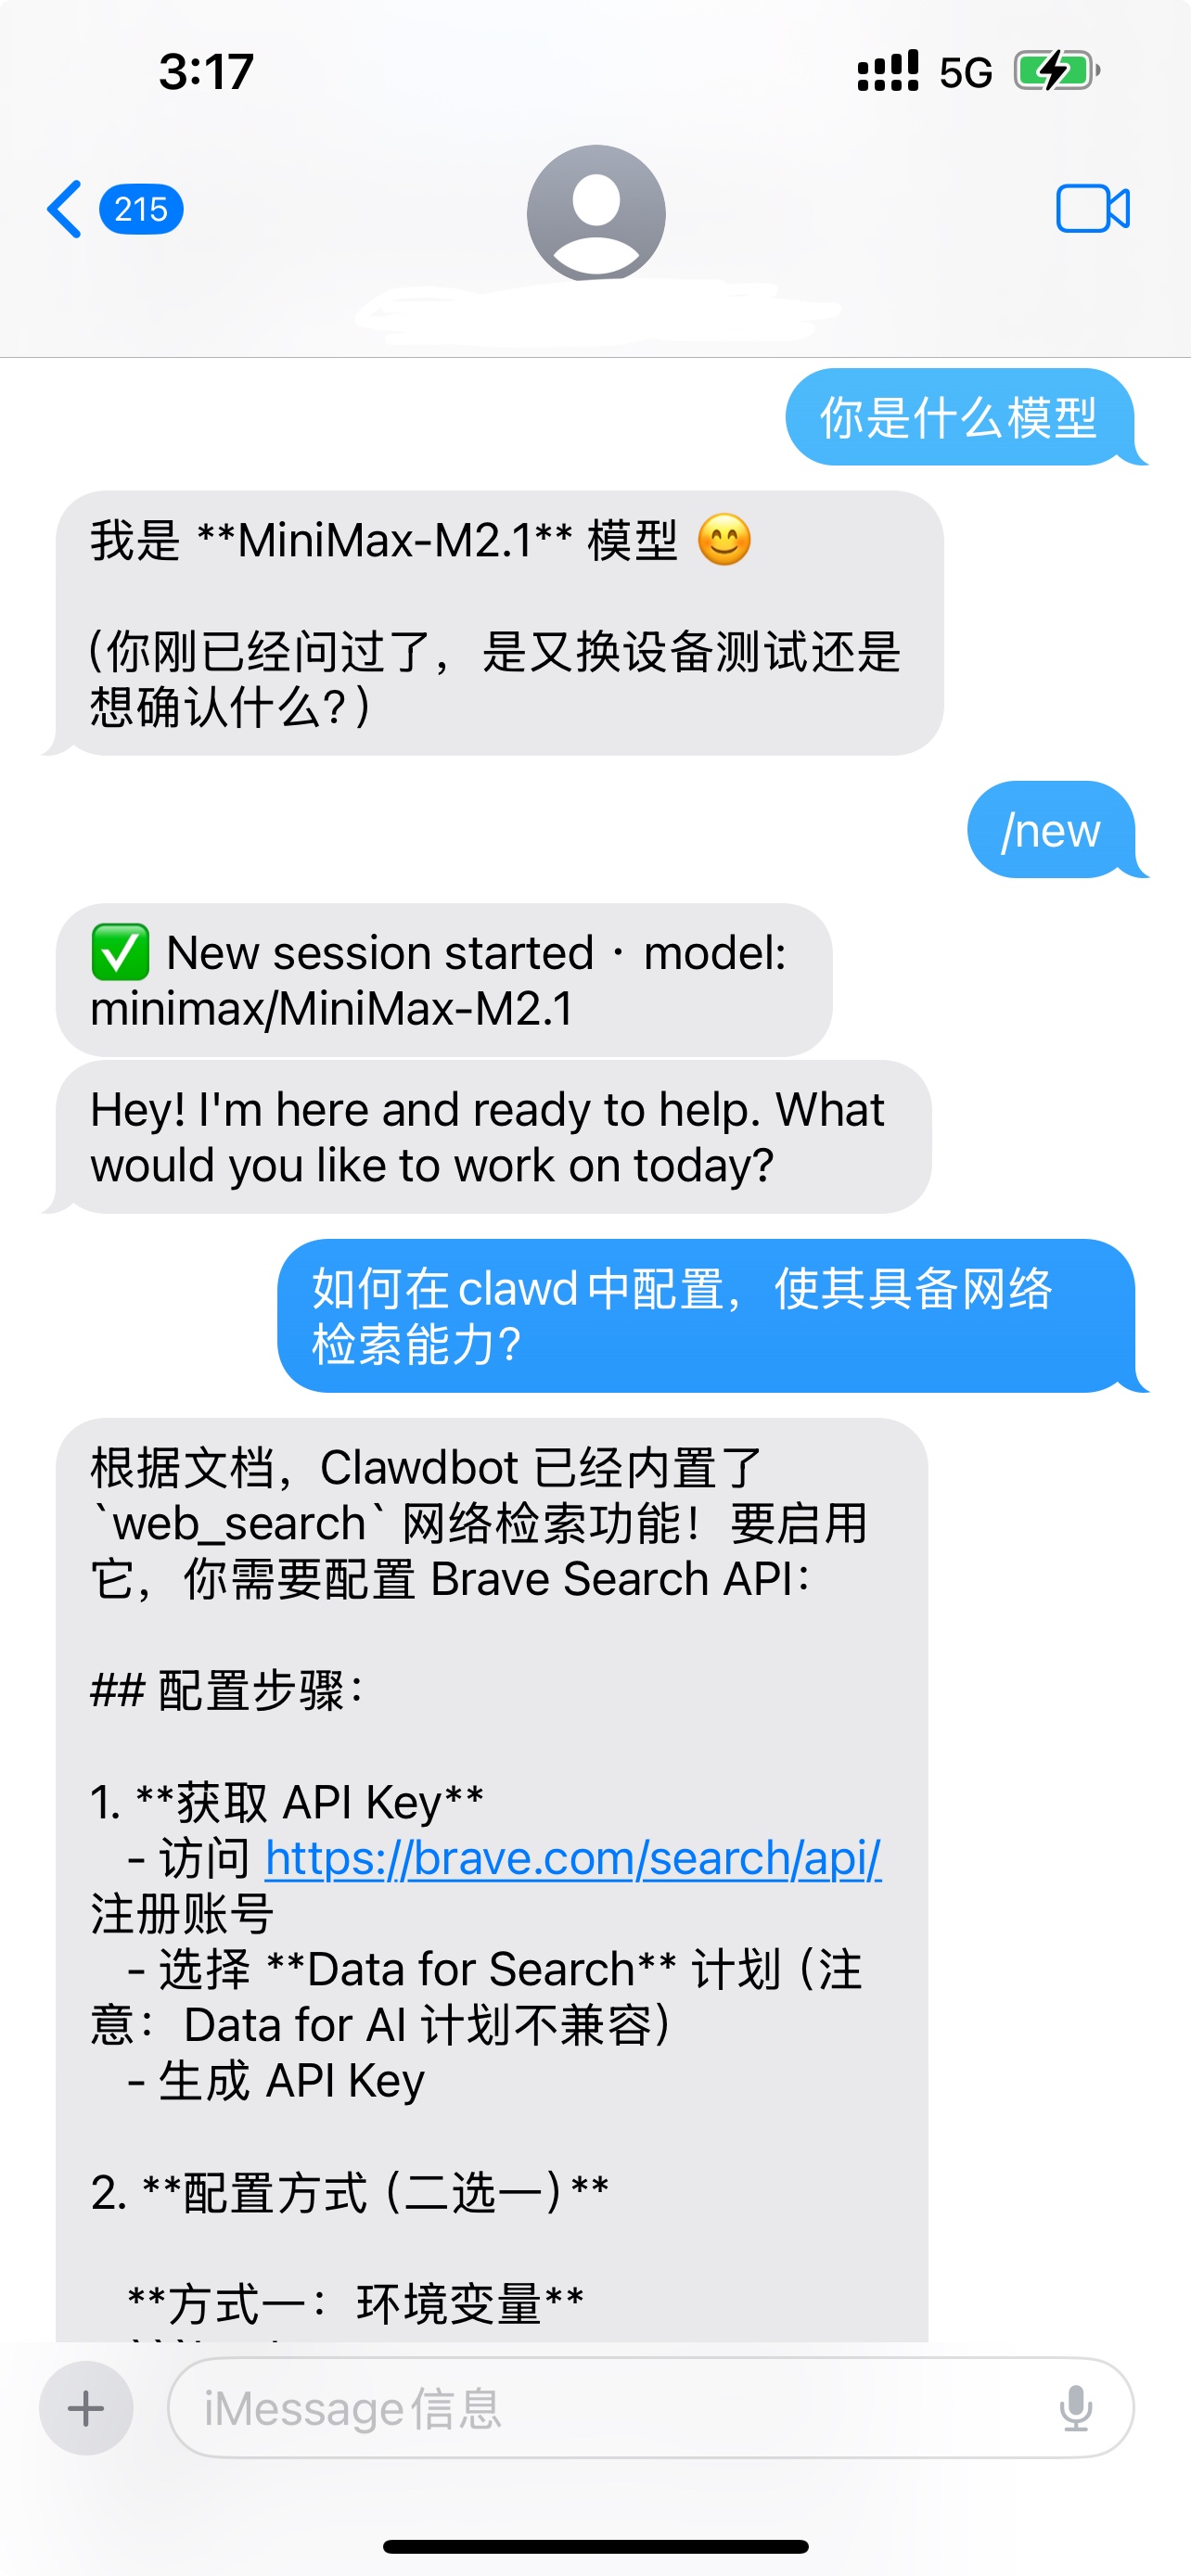
  <Step title="开始对话">
    配对完成后，您就可以通过 iMessage 与 MiniMax M2.7 驱动的 AI 助手进行对话了！

    <img src="https://filecdn.minimax.chat/public/747974c2-ace8-4edb-88a5-dadfc727387f.jpeg" alt="配置文件修改" style={{borderRadius: '8px', marginTop: '12px', maxWidth: '50%'}} />

    <Note>
      您的 OpenClaw AI 助手可以帮助您：

      * 回答问题和提供信息
      * 撰写和编辑文本
      * 代码辅助和调试
      * 创意任务和头脑风暴
      * 以及更多！
    </Note>
  </Step>
</Steps>

***

## 接入飞书

飞书插件现已作为 OpenClaw 官方插件，随当前版本内置发布，无需额外安装或源码编译。

<Columns cols={3}>
  <Card title="基础对话" icon="message-circle">
    支持飞书私聊和群聊中的 AI 对话交互
  </Card>

  <Card title="文件传输" icon="file">
    支持接收和发送文档、音频、图片、视频
  </Card>

  <Card title="互动卡片" icon="layout">
    支持互动卡片、流式回复和表情回复
  </Card>
</Columns>

### 创建飞书应用

<Steps>
  <Step title="访问飞书开放平台">
    1. 打开浏览器，访问 [飞书开放平台](https://open.feishu.cn/app)
    2. 使用飞书账号登录
    3. 点击「创建企业自建应用」
    4. 填写应用名称和描述，点击「确定创建」
  </Step>

  <Step title="获取应用凭证">
    在「凭证与基础信息」页面，复制以下凭证：

    * **App ID**（格式：`cli_xxx`）
    * **App Secret**

    <Warning>
      请妥善保管应用密钥，不要分享给他人或提交到代码仓库。
    </Warning>
  </Step>

  <Step title="添加权限">
    导航到「权限管理」，点击「批量导入」，粘贴以下权限配置：

    ```json theme={null}
    {
      "scopes": {
        "tenant": [
          "im:chat.members:bot_access",
          "im:message",
          "im:message.group_at_msg:readonly",
          "im:message.p2p_msg:readonly",
          "im:message:readonly",
          "im:message:send_as_bot",
          "im:resource"
        ]
      }
    }
    ```
  </Step>

  <Step title="启用机器人能力">
    在「应用能力」>「机器人」中，开启机器人能力并设置机器人名称。
  </Step>

  <Step title="配置事件订阅">
    在「事件与回调」页面：

    1. 订阅方式选择「**使用长连接接收事件**」（WebSocket 模式）
    2. 添加事件：`im.message.receive_v1`（接收消息）

    <Note>
      请确保 OpenClaw 网关正在运行后再配置此步骤。
    </Note>
  </Step>

  <Step title="发布应用">
    进入「版本管理与发布」页面，创建版本并提交发布。
  </Step>
</Steps>

### 配置 OpenClaw 飞书通道

<Steps>
  <Step title="添加飞书通道">
    运行以下命令进入交互式配置：

    ```bash theme={null}
    openclaw channels add
    ```

    选择 **Feishu**，然后按提示输入 **App ID** 和 **App Secret**。
  </Step>

  <Step title="验证配置">
    可以检查配置文件 `~/.openclaw/openclaw.json` 中飞书配置是否正确：

    ```json theme={null}
    {
      "channels": {
        "feishu": {
          "enabled": true,
          "accounts": {
            "main": {
              "appId": "cli_xxx",
              "appSecret": "xxx",
              "name": "My AI assistant"
            }
          }
        }
      }
    }
    ```
  </Step>
</Steps>

### 连接飞书测试

<Steps>
  <Step title="启动网关">
    ```bash theme={null}
    openclaw gateway start
    ```
  </Step>

  <Step title="添加群机器人">
    进入飞书，新建群聊后，在群设置中添加群机器人，搜索并选择上述创建的应用，并点击添加。
  </Step>

  <Step title="测试对话">
    在群聊中 @机器人 发送消息。首次使用时，机器人会返回一个配对码，在终端中运行以下命令进行配对：

    ```bash theme={null}
    openclaw pairing approve feishu <配对码>
    ```

    配对成功后即可正常对话。
  </Step>
</Steps>

***

<Tip>
  通过 OAuth 登录 `minimax-portal` 后，OpenClaw 的 `image` 工具会自动配置为使用 MiniMax [图像理解 MCP 服务](/token-plan/mcp-guide)背后的 VLM 端点，无需额外配置即可让您的智能体具备图像理解能力。
</Tip>

## 总结

在本教程中，您学习了如何：

* **安装和配置 OpenClaw**：使用 MiniMax M2.7 模型驱动 OpenClaw 开启工作
* **正确配置服务**：修改 API 地址以成功使用
* **接入 iMessage**：在 Mac 上配置 iMessage 通道与 AI 助手对话
* **接入飞书**：使用官方内置飞书插件在群聊中与 AI 助手对话

通过 OpenClaw 和 MiniMax M2.7，您现在可以随时通过 iMessage 或飞书与 AI 助手交流，体验便捷的智能对话服务。

***

## 相关资源

<Columns cols={3}>
  <Card title="OpenClaw 文档" icon="book-open" href="https://docs.openclaw.ai">
    官方文档
  </Card>

  <Card title="MiniMax M2.7" icon="sparkles" href="https://www.minimaxi.com/news/minimax-m27-zh">
    模型介绍
  </Card>

  <Card title="Token Plan" icon="credit-card" href="https://platform.minimaxi.com/subscribe/token-plan">
    立即订阅
  </Card>
</Columns>